Simplified Wiring Guide for R, Y1, Y2 Terminals
Tip: click the images to open an enlarged view in another tab. Close the tab to return to the article.


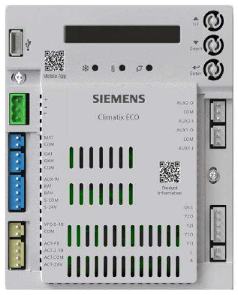
In this article we will cover the basic set up options needed for the field installed EconomizerOne Accessory for Small Rooftops Units 3 to 12.5 Tons. The EconomizerOne comes standard with an outdoor temperature sensor and a mixed air temperature sensor (also called supply air temperature sensor).
You will make all selections using the User Interface. It has a One-Line LCD display screen, three operations buttons, Up Button, Down Button, and the Enter Button.
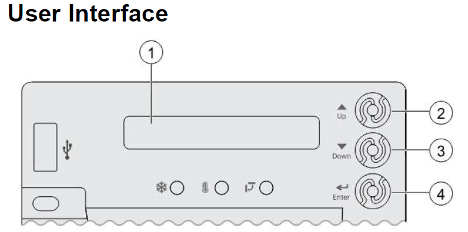
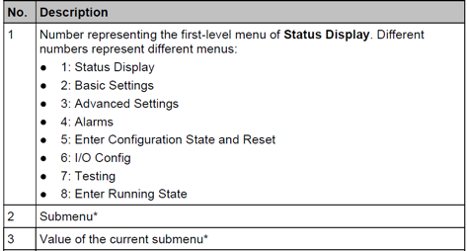
Menus are displayed in the Economizer Controller as per categories. There are eight first-level menus, each of which is represented by a number at the beginning of the line on the LCD. Pressing Enter plus Up or Down can toggle between different first-level menus.
Submenus follow the numbered first-level menus closely. Pressing Up or Down can toggle between different submenus.
At the end of the line, the LCD displays the value of the current submenu (if any). If the value is editable, pressing Enter enters the Edit mode. The value is then highlighted for change. After making a change by pressing Up or Down, press Enter to confirm the change and exit the Edit mode.
Before you start, make a note of the type of unit you have, example:
2 speed indoor fan
2 stages of cooling
outdoor air-dry bulb temperature sensor
Press the Up button twice to enter the 5CONFIG STATE, then Press Enter to the enter the 5CONFIG STATE, then press Enter again to confirm that you would like to enter this menu. The controller display screen will go blank, then it will display 6OCC menu.
Next press the Down button to the 6Y2O menu, this sets the number of cooling compressors, the default is COOL 2 (2 Stage). If your unit only has one compressor, change to NONE for 1 Stage. Press the Enter button, use the Down arrow button to change, then press the Enter button to confirm.
Next press the Down arrow button to 6FAN menu to set the number of indoor fan speeds. The default setting is 2SPEED. If your unit has 1 speed, 3 speed, or VFD, you will change the selection here by pressing the Enter button, then the using the Down arrow button to change the selection, then press Enter to confirm.
Next press the Down arrow button to the 8RUN STATE menu, press the Enter button twice. After a few seconds the controller will reboot.
Since we are using an outdoor air temperature sensor, so next use the Down arrow button to the 2TEMP OFF menu. This is the high temperature setting that limits the use of free cooling. The default setting is 63 F. (The most common setting is 55 F). To change, press the Enter button, then use the Up or Down arrow buttons to advance to desired temperature and press the Enter button to confirm.
Next using the arrow buttons, go to the 2FAN L ACT menu to set the minimum damper position when not in the free cooling mode and with a fan in low speed. The default setting is 3.6 V. Lower the voltage, less open of the damper and higher voltage the more open of the damper. To change, press the Enter button, then use the Up or Down arrow buttons to advance to desired voltage and press the Enter button to confirm.
Next using the arrow buttons, go to the 2FAN H ACT menu to set the minimum damper position when not in free cooling mode and with a fan in high speed. The default setting is 2.8V. Lower the voltage, less open of the damper and higher the voltage, more open the damper. To change, press the Enter button, then use the Up or Down arrow buttons to advance to desired voltage and press the Enter button to confirm.
Next using the arrow go to 5RESTART mode, then press Enter twice. This confirms all changes and restart the controller.
Sources:
Sources: POL224.00 Application Guide, HVACPartners (IIK-CRECON-SRT-01)
MicroMetl Corporation; link https://www.youtube.com/watch?v=ZEFPB9Fh-h8
Disclaimer: The technical statements, information and recommendations contained herein are believed to be accurate as of the date hereof, but Mingledorff’s does not make representations or warranties, express or implied, as to its accuracy, its completeness, or the results to be obtained. The information is being provided for informational purposes only and is intended for use by persons having adequate skill and expertise regarding the proper selection, use and application of the products and recommendations and at their own risk and discretion.
Tip: click the images to open an enlarged view in another tab. Close the tab to return to the article.
HVAC technicians often work in attics, rooftops, mechanical rooms, and outdoor environments where temperatures can become dangerously high. Proper hydration
Have you ever installed or started up a commercial heat pump? Did you notice there is not an “O” terminal
We use cookies and other tracking technologies to collect and store information, operate our website, remember your preferences, deliver targeted ads and content, and enhance your experience. You can manage or change your cookie preferences at any time through your browser or device settings. To learn more, including how we collect, use, or disclose your information, please review our Privacy Policy and Terms of Use. By interacting with this cookie banner or accessing the site, you consent to our Privacy Policy and Terms of Use, including the arbitration provision and class action waiver.
You are leaving our site and we cannot be held responsible for the content of external websites.