Bryant only:
Bryant Service Technician
This symbol is for an equipment ground- almost any time you see three lines parallel either horizontally or vertically- they will mean earth/ ground.
Here is an Outdoor Fan Motor where you can see it contains two windings, Start and Run. Also, in green is another symbol for ground
Pulled from an indoor ceiling cassette 40MBCQ
The chart/table on outdoor units have loads more of information so I will assist in clarifying.
These units are more complex and have more variables to consider.
*to keep things simple, we typically round close decimal numbers*
Min. Piping Length per each indoor unit- This is the minimum allowed amount of lineset for each indoor unit
Standard Piping Length per each indoor unit- this is the amount of lineset that has been “reserved” for each indoor unit for refrigerant charge purposes.
Max. outdoor-indoor height difference- how far you can separate the indoor from the outdoor vertically. Two labels are shown- IU indoor unit above OU outdoor unit and vice versa.
Max. height different between indoor units- if the indoor units are on different levels, then they should not exceed this amount of vertical separation amongst themselves.
Max. Length per each indoor unit- no indoor unit should have a lineset longer than this number. Do not exceed this number for any indoor unit lineset.
Max. Piping Length with no additional refrigerant charge- add together all of the lineset lengths for all the indoor units. If your lengths are above this number, then additional charge is needed.
Total Maximum Piping Length per system– when adding together all the indoor pipe lengths, this is the total length that the unit can support. Pipe lengths greater than this are not approved nor recommended.
Additional refrigerant charge- if your total lineset length is over the “Max. Piping Length with no additional refrigerant charge” amount, this is how many ounces per foot should be added to the unit for proper operation.
Pipe sizes: these show the pipe sizes with an asterisk (*) and then the quantity of those ports.
For example: from the 36K– 1/2 *2+3/8*2
This means 2 at ½ and 2 at 3/8.
In the event that the correct line set size is ran and it is not the same size as the hookup of this unit, use the factory supplied adapters to make the connections.
December 30, 2021
Scrolling Marquee Basics and Resetting Error Codes
On units that are equipped with a ComfortLink controls package, the user interface for the machine will include a Scrolling Marquee keypad as shown below.
This ComfortLink controls package can be factory installed on nearly all light commercial and applied product lines. Including but not limited to 30RB & 30RAP chillers, 48/50HC RTUs, and 48/50A & 48/50N & 48/50P series RTUs.
Using the buttons:
On the left side of the Marquee under MODE there are 11 categories.
The UP/ DOWN buttons can be used to navigate between them and also be used to navigate between the many different sub modes.
The ENTER button will advance into the mode category that is highlighted by a red light.
The ESCAPE button will bring you back out of that mode.
Each mode category (there are 11) has its own set of sub modes that flow in a left-to-right manner. Using the instructions above, you can use the ENTER and ESCAPE buttons to go into or come out of sub modes.
Here are two examples:
This ComfortLink controls package can be factory installed on nearly all light commercial and applied product lines. Including but not limited to 30RB & 30RAP chillers, 48/50HC RTUs, and 48/50A & 48/50N & 48/50P series RTUs.
Using the buttons:
On the left side of the Marquee under MODE there are 11 categories.
The UP/ DOWN buttons can be used to navigate between them and also be used to navigate between the many different sub modes.
The ENTER button will advance into the mode category that is highlighted by a red light.
The ESCAPE button will bring you back out of that mode.
Each mode category (there are 11) has its own set of sub modes that flow in a left-to-right manner. Using the instructions above, you can use the ENTER and ESCAPE buttons to go into or come out of sub modes.
Here are two examples:
Expanding the display abbreviations:
When navigating through the modes and sub modes, most of the actual names will be abbreviated. At any time when the display is showing an abbreviation, you can press the ENTER and the ESCAPE buttons at the same time to expand what it means. When this button combination is done the marquee will scroll the wording that the abbreviation stands for. If pressing them at the same time is difficult, you can press the ENTER button and hold it then press the ESCAPE button. While the marquee is scrolling the words, you can press the ENTER button again to pause or play the scrolling message.
Checking out errors
If the red LED is lit up solid next to Alarm Status, this is an indication that something within the unit itself or something outside of the unit has caused the system to shut down to further protect itself from damage. To get the system to come back online, the problem must be identified, corrected, and then the error code needs to be reset.
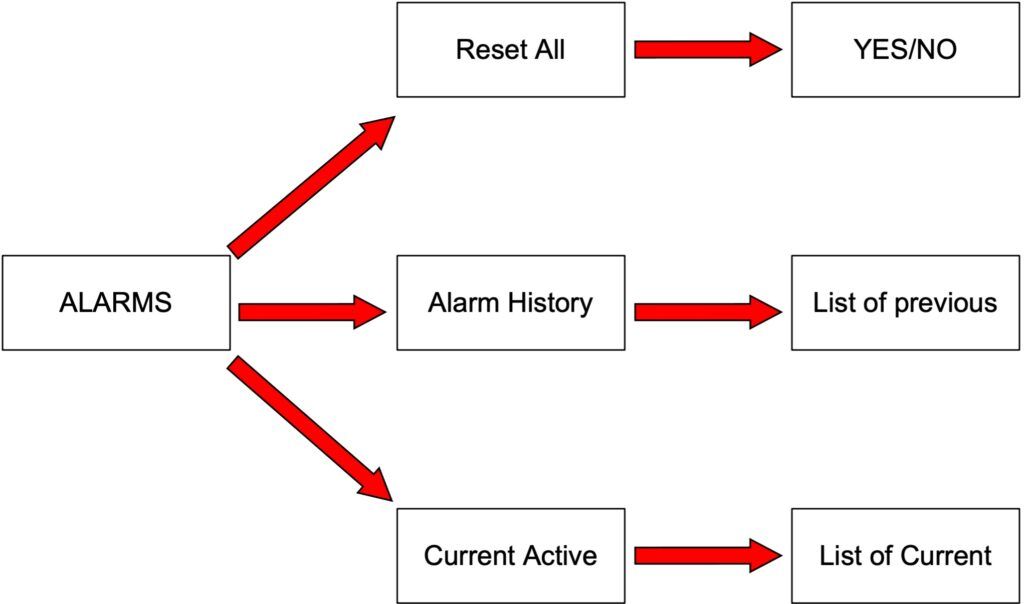
When it comes to checking and resetting an alarm(s), all the machines have the same instructions but the actual abbreviations may vary. Here is the flow without abbreviations:

While viewing the alarms in Alarm History or Current Active Alarms you can press the ENTER and ESCAPE buttons at the same time as mentioned above and the marquee will scroll the description of what the error means along with the time and date that it occurred. The same rules apply for pausing/ playing the message as well. When looking at this data it is important to also know what the system’s time and date are to ensure you get a valid timeline for the errors.
When you enter the list of alarms either current or active you can use the up/down buttons to see what the other alarms are if they exist.
7NO” will begin to flash.
Use the Up/Down buttons to change No to Yes and press enter.
The screen will display “Yes” briefly and will reset itself back to “No”.
The LED next to Alarm Status will turn off.
If the LED is still illuminated, then the problem wasn’t corrected or another issue has come up.
***If you are prompted for a password: for the purposes of this letter I will not disclose what to enter but I will advise that the password can be found in the Controls, Troubleshooting, Operation manual for your system.
The operator of the marquee should assume all responsibility in ensuring that the reasons that caused the system’s alarms are corrected prior to resetting the alarms.***
More to Explore